
Happy Kombucha sprouting guide
How to Sprout Seeds and Beans at Home
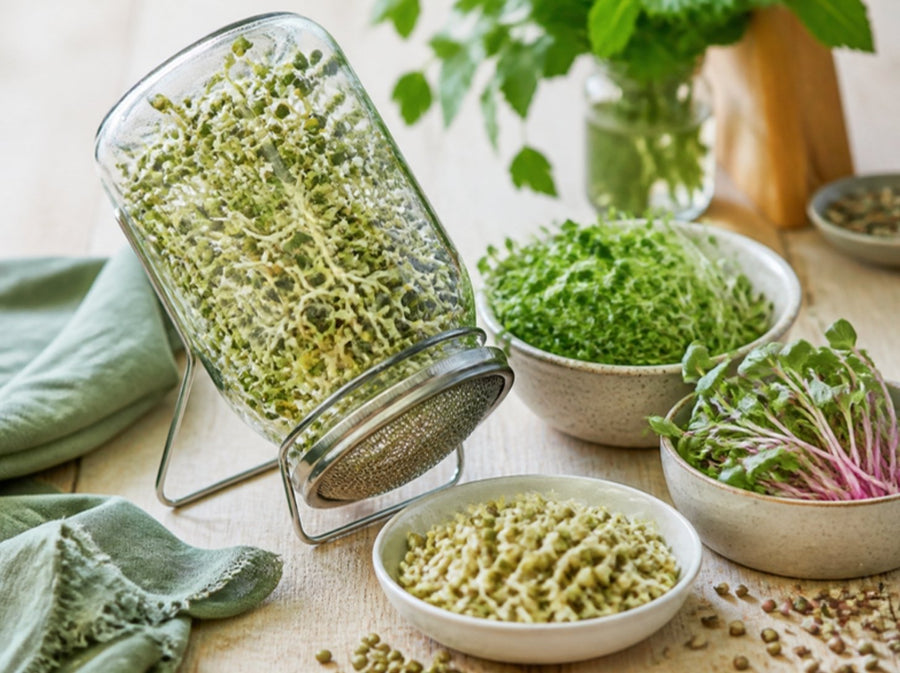
Sprouting turns dry seeds and beans into fresh, crunchy greens in just a few days, right on your kitchen worktop. There's no soil and no garden needed, just seeds, water, a jar and a couple of rinses a day. This guide shows you how to sprout, which seeds to try, and how to keep your sprouts fresh and safe. Read it through before you start, and get in touch if you're unsure about anything.
How it works
A sprout is a seed that has just started to grow into a plant. Soaking wakes the seed up, and regular rinsing keeps it damp while it grows its first shoot. After a few days you have a tender, crunchy sprout ready to eat.
The two golden rules are: rinse often, and drain well. Sprouts like to be damp, but never sitting in water.
At a glance
| Stage | What you do | Time |
|---|---|---|
| 1. Soak | Cover the seeds with plenty of cool water | 4 to 12 hours, depending on the seed |
| 2. Rinse and drain | Rinse with fresh water, drain well, and leave the jar tilted | 2 or 3 times a day |
| 3. Harvest | Give them a last rinse and dry them well | After 2 to 7 days |
| 4. Store | Keep them in the fridge in a container lined with kitchen paper | Up to 3 days |
The best temperature is 18 to 22°C. Keep them out of direct sunlight. In a warm kitchen, rinse more often so they stay fresh.
What you'll need
- Seeds or beans sold for sprouting, such as our organic sprouting seeds
- A sprouting jar with a mesh lid, or a clean glass jar covered with muslin and an elastic band
- Something to stand the jar on at an angle so it drains, such as a bowl or dish rack
- Fresh, cool drinking water
- Kitchen paper and a lidded container for storing
Use seeds sold for sprouting. Seeds sold for sowing in the garden may have been treated, and aren't meant to be eaten.
How to sprout
-
Measure your seeds
Seeds grow to many times their size. For a 1 litre jar, use about 1 to 2 tablespoons of small seeds such as broccoli, radish or alfalfa, or about 4 tablespoons of beans such as mung beans or lentils.
-
Rinse and sort
Rinse the seeds in a sieve and pick out any broken seeds, stones or bits.
-
Soak
Put the seeds in your jar, cover with plenty of cool water and leave to soak (see the seed table for times). Small seeds need 4 to 8 hours, beans 8 to 12 hours.
-
Drain
Drain off the soaking water through the mesh lid or muslin, then rinse with fresh water and drain again. Shake out as much water as you can.
-
Tilt the jar
Stand the jar upside down at an angle, so any water can drain away and air can get in. Keep it somewhere at room temperature, out of direct sunlight.
-
Rinse 2 or 3 times a day
Each morning and evening (and at lunchtime in warm weather), fill the jar with fresh water, swirl, drain well and tilt it again. This keeps the sprouts fresh and washes away anything they don't need.
-
Green them up (optional)
For leafy sprouts like broccoli, radish and alfalfa, put the jar in indirect daylight for the last day. The little leaves will turn green.
-
Harvest
When the sprouts are the size you like, give them a final rinse. Swish them in a bowl of water if you want to float off loose husks. Then drain and dry them really well on a clean tea towel or kitchen paper.
Which seeds to try
| Seed | Soak | Ready in | Taste |
|---|---|---|---|
| Mung beans | 8 to 12 hours | 3 to 5 days | Crunchy and fresh, the classic beansprout. Great in stir-fries |
| Broccoli | 6 to 8 hours | 4 to 6 days | Mild and slightly peppery, lovely in salads and sandwiches |
| Radish (BioSnacky radish) | 6 to 8 hours | 4 to 6 days | Hot and peppery, with pretty pink stems |
| Fenugreek | 6 to 8 hours | 3 to 5 days | Warm and slightly bitter. Mix with milder sprouts, and harvest young |
| Alfalfa | 4 to 8 hours | 5 to 7 days | Mild and delicate |
| Green or brown lentils | 8 to 12 hours | 2 to 4 days | Nutty. Eat them when the tails are short |
| Seed mixes, such as BioSnacky mild aromatic mix | Follow the instructions on the packet, as the seeds are chosen to sprout together | ||
Don't sprout red kidney beans to eat raw. Raw and sprouted kidney beans contain a natural toxin that's only destroyed by fast boiling. Chickpeas and larger beans are also best cooked after sprouting.
Sprouts and food safety
Sprouts grow in warm, damp conditions, and unfortunately some unwanted bacteria like those conditions too. The UK Food Standards Agency advises that sprouted seeds should be cooked until steaming hot all the way through, unless they're labelled as ready to eat. This is especially important for pregnant women, babies and young children, older people, and anyone with a weakened immune system.
One of the joys of growing your own is that you can eat them really fresh. Shop-bought sprouts may have been sitting around for days before you buy them.
- Buy seeds sold for sprouting, from a trusted supplier
- Wash your hands, jar and lid well before you start
- Use fresh drinking water for soaking and rinsing
- Rinse 2 or 3 times a day and always drain well. Rinsing often and draining well helps reduce the risk, as it's stagnant water sitting in the jar that lets unwanted bacteria build up
- Dry your sprouts well before storing them in the fridge
- Rinse them again just before eating
- Throw away any sprouts that smell bad, look slimy or have gone mouldy
- Cooking them until steaming hot, for example in a stir-fry, soup or curry, is the safest way to eat them
Storing your sprouts
- Dry them first. Damp sprouts spoil quickly, so dry them well on a tea towel or kitchen paper.
- Fridge: keep them in a lidded container lined with kitchen paper, and eat within 3 days. Rinse them just before eating.
- Grow little and often. Start a new jar every couple of days so you always have fresh sprouts.
- Ideas for using them: stir-fries, soups, curries, omelettes, wraps and sandwiches. Mung bean sprouts and lentils are lovely added to dishes at the end of cooking.
Caring for your jar
- After each batch, wash your jar and mesh lid in hot soapy water, rinse well and leave to dry completely.
- Use a bottle brush to clean the mesh, as tiny roots and husks can get stuck in it.
- Store your jar dry, with the lid off.
Troubleshooting

Root hairs or mould? On the left are healthy sprouts with fine, fluffy white root hairs. They're normal and disappear when you rinse. On the right is mould: fuzzy, discoloured patches that stay after rinsing, often on the seeds, with a musty smell. Throw those away.
| Problem | What to try |
|---|---|
| The seeds haven't sprouted | It may be too cold, the seeds may be old, or they may have dried out between rinses. Move them somewhere warmer, rinse more often, and try a longer first soak (up to 16 hours). Use fresh seeds that are sold for sprouting. |
| They smell sour or musty | They're too wet or too warm. Drain them really well and tilt the jar so air can get in. If they smell bad or look slimy, throw them away and start again with a clean jar. |
| Fuzzy white hairs on the roots | Look closely. Tiny, fine root hairs all over the roots are normal, and they disappear when you rinse. Fuzz that stays after rinsing, smells musty, or is on the seeds themselves is mould, so throw them away. |
| Lots of unsprouted seeds | A few will always stay hard. Float them off in a bowl of water at harvest. If there are lots, try a longer soak or fresher seeds. |
| Sprouts turning brown | They've been left too long or kept too wet. Harvest them sooner, drain really well, and dry them before they go in the fridge. |
| Short, stubby mung bean sprouts | That's normal at home. Shop-bought beansprouts are grown under weights in the dark. Keeping your jar in the dark gives paler, longer sprouts. |
| Chia, flax or cress seeds have turned to gloop | These seeds form a gel when wet, so they don't work in a jar. Sprout them on a damp plate or tray instead, and mist them with water. |
| The soaking water smells or has gone cloudy | The soak was too long or too warm. Stick to the soak times, and in warm weather change the water halfway through long soaks. |
| Thin, leggy sprouts | They may be getting too much light. Keep them in indirect light or loosely covered, and only give them light on the last day or two to green up. |
| Bitter taste | Some sprouts, like fenugreek, get more bitter as they grow. Harvest them younger, or mix with milder sprouts. |
| They spoil quickly in the fridge | Dry them really well before storing, line the container with kitchen paper and eat them within 3 days. |
Still stuck? Take a photo and send it to us, and we'll help you work out what happened.
Frequently asked questions
Can I use any seeds?
Use seeds and beans that are sold for sprouting or eating. Seeds for planting in the garden may have been treated. Avoid sprouting red kidney beans to eat raw.
How many seeds should I use?
For a 1 litre jar, about 1 to 2 tablespoons of small seeds or about 4 tablespoons of beans. They grow much bigger than you expect.
Do sprouts need light?
No, they grow happily in the dark. A little indirect daylight on the last day turns leafy sprouts green.
How often should I rinse them?
2 or 3 times a day, and more often in warm weather. Always drain well afterwards.
Are the little white hairs mould?
Usually not. Tiny root hairs appear just before the sprout grows. They look fuzzy but vanish when rinsed. Mould stays put, smells musty and often sits on the seeds themselves.
Should I eat sprouts raw or cooked?
The Food Standards Agency advises cooking sprouts until steaming hot unless they're labelled as ready to eat, especially for anyone pregnant, very young, older or with a weakened immune system. Cooking them in stir-fries, soups and curries is the safest way to enjoy them.
Can I freeze sprouts?
Not really, as they lose their crunch when thawed. Frozen sprouts are fine stirred into cooked dishes like soups, stir-fries and curries.
How long do sprouts keep?
Up to 3 days in the fridge, dried well and stored in a container lined with kitchen paper.
Still stuck?
Every culture behaves a little differently. Send us a message, with a photo if you can, and we'll take a look. Or book a one-to-one session and we'll help you set up your brew.
Get in touch Book brewing advice Culture ClinicReady for more?
Starting again, brewing a bigger batch, or after a fresh culture for a friend? Everything you need is in the shop.
Shop sprouting seedsFermenting vegetables guideAll brewing guides